

Showing posts with label paper plate activity. Show all posts
Showing posts with label paper plate activity. Show all posts
Wednesday, June 28, 2023

Monday, June 26, 2023

Wednesday, November 30, 2022

Monday, October 10, 2022

Monday, December 14, 2015

Friday, October 10, 2014
Rainbows in the Room

Half a paper plate and tissue paper (or crepe streamers, or even strips of construction paper) make these cute rainbows.

Friday, April 25, 2014
Paper Plate Easter Bunny - And a Freebie!
We used the small 6" paper plates. Simply fold in half.
Color the nose with a pink crayon (or marker). Add black whiskers and a googly eye.
Here's the link for the ears. Color the inset pink on one ear. The other ear "faces outward", so there is no insert. Cut out and glue the ears on the inside of the plate.
Final touch is a cotton ball tail!

Monday, January 27, 2014
Paper Plate Snowman Art Activity, With Freebie!

I came up with this idea after looking at a lot of paper plate snowmen on other teachers' walls. But theirs use three little plates, and I wanted to do something different. So I created the template below. I think they turned out pretty cool!
If you click on the template, you'll get the full 8.5x11 inch version you can right click, save, and then print.

Wednesday, December 12, 2012
Oatmeal Wreaths
Right off, I'm going to say that this is a very messy activity, so be sure to lay newspaper down, and have all long sleeves secured above the elbows! But it's so much fun, and the kids had a blast doing it, that I had to share!
You need small paper plates, uncooked oatmeal, and green tempera paint. Toppers are red pompoms.
First, have each child cut out the center of their paper plates. Be sure they put their names on the back. Then lay a thin layer of glue over the outer ring. (I had them use their index finger to smear the glue around.)
Next, put the oatmeal in a container, and squirt paint on top. Let the kids mix the oatmeal with their fingers. (The neat thing is, they don't need to wash their hands BEFORE this activity!)
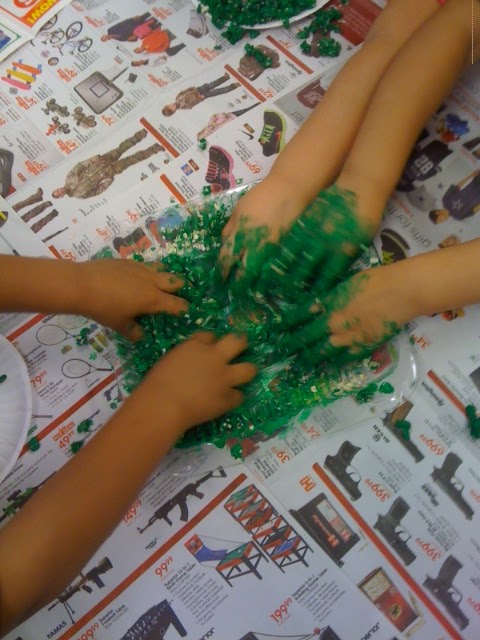


Voila! An oatmeal wreath they couldn't stop touching. The sensory input had a big impact! A fellow Kinder teacher said I should have done this while we were studying the letter O, since the wreath looks like an O, and we used Oatmeal, but I had run out of time before I could include it.
You need small paper plates, uncooked oatmeal, and green tempera paint. Toppers are red pompoms.
First, have each child cut out the center of their paper plates. Be sure they put their names on the back. Then lay a thin layer of glue over the outer ring. (I had them use their index finger to smear the glue around.)
Next, put the oatmeal in a container, and squirt paint on top. Let the kids mix the oatmeal with their fingers. (The neat thing is, they don't need to wash their hands BEFORE this activity!)
Next, have them pat a thin layer of colored oatmeal onto the glue and outer ring. (Child with gray sleeve did get it in the paint, but fortunately tempera is washable.)
Let dry. We did this activity in the morning, and didn't add the pompoms until right before the end of school. Next time, I'll have them dry overnight.
Voila! An oatmeal wreath they couldn't stop touching. The sensory input had a big impact! A fellow Kinder teacher said I should have done this while we were studying the letter O, since the wreath looks like an O, and we used Oatmeal, but I had run out of time before I could include it.
Friday, May 25, 2012
Eating Healthy (So a Child Can Understand It)

Our students keep hearing about "eating healthy" and making healthy choices. So to help my class, we took paper plates and divided them into fourths. We then labeled each section: meat, fruit, bread, and vegetable. And we "filled" each section with pictures cut from catalogs. We also discussed the fact that a piece of meat or a pile of mashed potatoes covering more than its "share" is too much. I think the lesson worked, especially when I watched them making their choices in the cafeteria.
Monday, February 6, 2012
I Spy - Math and Language Arts Integrated


I borrowed an idea I saw from a teacher on Pinterest who had given everyone in her class "math bags". The object was for each child to bring back 5 items from home. Subsequently, the teacher put all of the objects into a pile and had her class divide them up into groups. I used a brown paper bag, and the only restriction was that they couldn't bring back any food items. The sorting and classifying took 2 days, as we also did a Venn diagram to label and explain why the objects had been sorted a particular way.
After removing the objects too large for the small paper plates, each student got to pick any 5 items (they didn't have to pick their own) and put them onto the plate already slathered with a thin layer of glue. The plates were allowed to dry overnight.
The next day each child filled out an I SPY paper using creative spelling. When that was done, I hung the plates out in the hallway, along with the papers, and parents-teachers-students got to see if they could pair up the paper with the plate.
You can get your copy of my I SPY template here.
Subscribe to:
Posts (Atom)